9
2012
How-To Print Business Cards in Adobe Bridge
Backstory : I run my own computer business and I haven’t updated my business card in a few years (and it’s always been ugly). I finally decided to re-create it, only to realize making it in Word is / has always been painful, and Photoshop was a much better option. After creating a design I liked, it was time to print, and I couldn’t find adequate documentation online…so I played around! Here’s how to print your business card using Adobe Bridge.
Supplies Needed: Business card paper (the 2×3.5″ kind), printer, Photoshop, Bridge
Ok so I’m going to assume you have saved your .psd somewhere and you’ve opened Adobe Bridge.
Steps:
1. Locate the file in Bridge and single click on it.
2. Click OUTPUT at the top right of the program (to the left of the search bar). You should now see a preview of the file in the center of the program and various panels to the right including “Document”, “Layout”, etc. and a scroll bar.
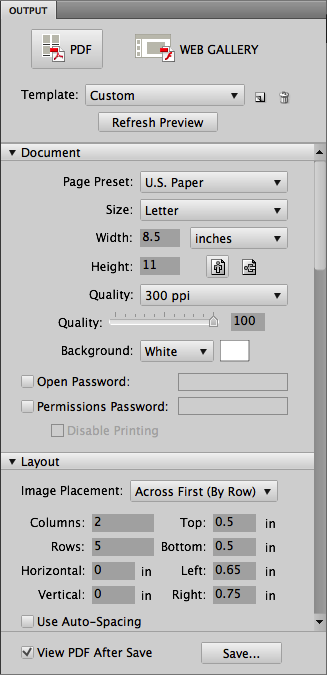
3. At the bottom of this post is a picture of the important settings. Basically, if you’re using the same typical business card paper as I did, these settings should be the same. I’ll type them out here just in case.

Under Document:
- Page Preset: US Paper
- Size: Letter
- Quality: 300 dpi
Under Layout:
- Image Placement: Across First (By Row)
- Columns: 2
- Rows: 5
- Horizontal: 0 in
- Vertical: 0 in
- Top: 0.5 in
- Bottom: 0.5 in
- Left: 0.75 in
- Right: 0.75 in
Under Overlays – make sure to uncheck “Filename”.
That’s it! Click “Save…” and you should have  a ready-to-print PDF of your business cards!
ADS
Archives
- November 2012 (1)
- August 2012 (1)
- June 2012 (8)
- March 2012 (3)
- June 2011 (2)
- January 2011 (2)
- September 2010 (2)
- August 2010 (3)
- July 2010 (3)
- January 2010 (2)
- December 2009 (2)
- November 2009 (1)
- June 2009 (1)
- April 2009 (9)

 An article by


